

How To Fix TPE Sex Dolls
Structure:
* Content on TPE Doll Repair
* Effortless TPE Doll Repairing
* Essential Materials
* Illustrative Applications for Various Repair Scenarios and TPE Paste Usage
* The Smoothing and Finishing Procedure
* Concluding Thoughts for a Successful TPE Love Doll Restoration


* Content on TPE Doll Repair
Compared with silicone materials, the maintenance of TPE will be easier, and ordinary enthusiasts can operate it immediately at home. Therefore, we have specially prepared these materials to deal with the maintenance-related problems you may encounter when handling TPE dolls.
* Effortless TPE Doll Repairing
Hot Towel Treating
Begin by using a clean, hot towel to cover the visible pressure dents for a period of time. Next, put on a glove and gently pat the same area with your hand. Repeat these steps until the indentation vanishes.
The Hair Dryer Approach
Believe it or not, a hairdryer is a versatile tool. While it's commonly associated with drying wet hair, it also provides a solution for repairing your TPE doll.
To start, grab a damp, preferably white, cloth. Cover the pressure marks with the cloth and apply heat to the surface. Continue this process for a duration, and you'll observe the gradual disappearance of pressure marks and indentations on your sex doll's surface.
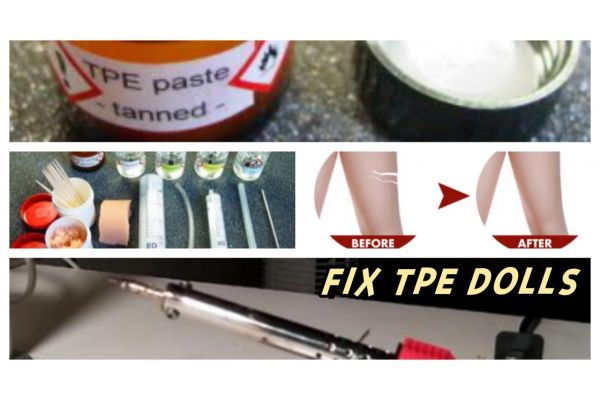
* Essential Materials
· 15 ml / 0.5 oz of TPE paste with medium consistency, stored in an airtight container
· 10 ml / 0.33 oz of solvent "Preparer," stored in an airtight container with a brush
· 10 ml / 0.33 oz of solvent "Smoother," stored in an airtight container with a brush
· 10 ml / 0.33 oz of solvent "Finisher," stored in an airtight container with a brush
· 10 ml / 0.33 oz of white oil, stored in an airtight container with a brush
· 5 g of shredded TPE material in a solvent-resistant small container
· Solvent-resistant small container for mixing TPE paste of different consistencies
· Toothpicks for blending the TPE paste
· 5 ml syringe for low-viscosity TPE paste
· Blunt 8 cm cannula with a 2 mm diameter for low-viscosity TPE paste
· 20 ml syringe for medium and thick liquid TPE paste
· 10 cm infusion hose for medium and thick liquid TPE paste · TPE piece for testing
- Shredded TPE Material: Use the shredded TPE material in combination with the TPE paste from the brown container to create thick-liquid TPE paste and dense TPE jelly. If you require additional TPE paste, it's easy to make more with the consistency you need. Simply add some solvent "Preparer" to the shredded TPE material.

* Illustrative Applications for Various Repair Scenarios and TPE Paste Usage

1.) Addressing Fraying/Abrasion:
- Delicately elevate protruding TPE fragments using tweezers.
- Employ precise, sharp fingernail scissors to trim these protrusions.
- For this repair, a small quantity of thinly-liquid TPE paste is required.
- Extract a few drops of solvent using a 5 ml syringe with a blunt cannula and transfer it to a mixing vessel.
- Utilize a toothpick to collect medium-viscous TPE paste from the container, placing it in the mixing vessel to blend into a thin liquid TPE paste.
- Draw up the thin-liquid TPE paste with the 5 ml syringe and cannula.
- Prepare the frayed area with the solvent "Preparer" (as previously demonstrated).
- Apply the thin TPE paste cautiously.
- The thin liquid TPE paste can be gently manipulated with the blunt cannula tip if needed, and any minor air bubbles can be removed using the cannula tip.
- Allow it to cure for two hours.
- Following the curing period, the TPE paste may have slightly settled due to solvent fusion and evaporation.
2.) Fixing Small Punctual Holes:
- Thin-liquid TPE paste is the ideal choice for this repair, as previously demonstrated in the mixing process.
- Prepare the mini-holes using the solvent "Preparer" (as shown previously).
- To dispense drops of thin liquid TPE paste, only the blunt cannula is needed.
- By immersing the blunt cannula in the thin liquid TPE paste, a single drop can be collected and gently applied.

3.) Addressing Small Open-Air Bubbles:
- Thin-liquid TPE paste is also the recommended choice for this repair.
- The mixing process and drawing up with a 5ml syringe equipped with a blunt cannula have been previously illustrated.
- Prepare the air bubble area with the solvent "Preparer" (as previously shown).
Now we very slowly inject the thinly-liquid TPE paste into the air bubble. In case an air bubble pops up during filling, just pierce it with a toothpick. Allow to cure for two hours.
4). Addressing an Outbreak or Eruption:
For this particular repair, we employ TPE paste with a medium-viscous consistency directly sourced from the brown container. To facilitate this, we utilize a 20 ml syringe equipped with an infusion hose.
Begin by preparing the outbreak using the solvent "Preparer," as previously demonstrated. Next, gently introduce the TPE paste into the outbreak or eruption. As this repair concludes, a curvature containing TPE paste will naturally form over the affected area. Due to the solvent's evaporation causing some volume loss, this curvature will gradually align with the surrounding surface.
Allow the repair to cure for a period of three hours.
The critical finishing touch involves smoothing with the solvent. Ensure that only a minimal amount of solvent is on the brush, as excessive solvent can lead to unnecessary dissolution within the TPE material.
If this occurs, please pause until the solvent has evaporated. The most effective smoothing occurs during the "wiping dry" phase. Perform just one gentle wipe for a brief duration and then cease.
If there are ridges on the surface resulting from the filling of areas with diluted TPE paste, we can remedy this by smoothing these areas using the solvent "Smoother." Glide the brush in a circular motion across the surface.
Effective TPE Doll Repair: A Patient Process
Successful TPE doll repair necessitates time, a relaxed approach, and unwavering patience. Rushed and imprecise repairs often yield unsatisfactory results.
Achieving a successful repair with the TPE repair kit "comfort" hinges primarily on the precise mixing of TPE paste as per the provided guidelines. Keep in mind that when dealing with small drops of low-viscosity TPE paste, the blunt cannula can be utilized without requiring the syringe. The syringe should only be employed when larger quantities of TPE paste are necessary.
To ensure an invisible repair outcome, it is imperative to handle the solvent "Smoother" correctly. The ratio between the quantity of gentle solvent applied and the required brush movements is of utmost importance.
We emphasize the recommendation to utilize the provided TPE piece for practicing these steps beforehand. The TPE paste, solvent, and shredded TPE material are intentionally included to actively acquaint you with the behavior of TPE material. This preparation will equip you to successfully repair your actual TPE love doll.
Repairing Metal Skeleton Breakthroughs


We need to first use clips or small pieces of wood or metal pieces to fix the part where the finger has been pierced, and then use a welding pen to partially melt it, then melt the patch into the wound, and finally cool it. Of course, do the necessary "bandaging" and use Fix with previous fixings.
* Concluding Thoughts for a Successful TPE Love Doll Restoration
Efficient TPE Doll Repairing: A Patient Process
Repairing TPE dolls is a task that demands time, relaxation, and patience. Rushed, inaccurate repairs seldom yield success.
To achieve a triumphant repair using the TPE repair kit "comfort," the key lies in the initial mixing of the TPE paste, adhering to the specified requirements. It's worth noting that for small drops of low-viscosity TPE paste, the blunt cannula can be used without the need for the syringe. The syringe should be reserved for cases requiring a greater amount of TPE paste.
The ultimate success of rendering the repair imperceptible rests in skillfully handling the solvent "Smoother." The correct balance between the volume of gentle solvent and the precise brush movements is paramount.
We strongly recommend practicing these steps beforehand using the provided TPE piece. The quantity of TPE paste, solvent, and shredded TPE material included in the kit is designed for hands-on learning about the characteristics of TPE material. This preparation equips you for the effective repair of your actual TPE love doll.
Recent comments